
Tiptap 특징
Headless It’s headless and comes without any CSS. You are in full control over markup, styling and behaviour.
Framework-agnostic Out of the box, Tiptap works with Vanilla JavaScript and Vue.js, but it’s also possible to use it in React, Svelte and others.
TypeScript TypeScript helps to find bugs early and gives you a nice autocomplete for the API on top of the extensive human written documentation.
Collaborative Real-time collaboration, syncing between different devices and working offline isn’t hard anymore. Keep everything in sync with the magic of Y.js.
Community There’s so much content shared, so many people helping out in issues and a ton of community extensions, you’ll be surprised how much that all can help.
주의사항
현재 진행중인 프로젝트에서 도입하면서 블로그 글을 작성하느라, 코드를 편집하다보니 제대로 돌아가지 않을 수 있습니다. :-)
프로젝트에 tiptap 추가하기
1.프로젝트 폴더 내에서 터미널을 열어 아래의 명령어로 설치하기
$ npm install @tiptap/vue-3 @tiptap/starter-kit
2.tiptap 컴포넌트 만들기
현재 사용중인 프로젝트에서 fontawesome https://fontawesome.com 를 사용하고 있어서 버튼에 사용했습니다.
-> Tiptap 버튼 예시 - https://tiptap.dev/examples/default -> commands 예시 - https://tiptap.dev/api/commands
(1) Tiptap 컴포넌트 생성
<template>
    <div>
        <div class="editor__header">
            <button class="menu-item" @click="editor.chain().focus().toggleBold().run()" :class="{ 'is-active': editor.isActive('bold') }">
                <i class="fa-solid fa-bold"></i>
            </button>
            <button class="menu-item" @click="editor.chain().focus().toggleItalic().run()" :class="{ 'is-active': editor.isActive('italic') }">
                <i class="fa-solid fa-italic"></i>
            </button>
            <button class="menu-item" @click="editor.chain().focus().toggleStrike().run()" :class="{ 'is-active': editor.isActive('strike') }">
                <i class="fa-solid fa-strikethrough"></i>
            </button>

            <div class="divider"></div>

            <button class="menu-item" @click="editor.chain().focus().toggleHeading({ level: 1 }).run()" :class="{ 'is-active': editor.isActive('heading', { level: 1 }) }">
                h1
            </button>
            <button class="menu-item" @click="editor.chain().focus().toggleHeading({ level: 2 }).run()" :class="{ 'is-active': editor.isActive('heading', { level: 2 }) }">
                h2
            </button>
            <button class="menu-item" @click="editor.chain().focus().toggleHeading({ level: 3 }).run()" :class="{ 'is-active': editor.isActive('heading', { level: 3 }) }">
                h3
            </button>
            <button class="menu-item" @click="editor.chain().focus().toggleHeading({ level: 4 }).run()" :class="{ 'is-active': editor.isActive('heading', { level: 4 }) }">
                h4
            </button>
            <button class="menu-item" @click="editor.chain().focus().toggleHeading({ level: 5 }).run()" :class="{ 'is-active': editor.isActive('heading', { level: 5 }) }">
                h5
            </button>
            <button class="menu-item" @click="editor.chain().focus().toggleHeading({ level: 6 }).run()" :class="{ 'is-active': editor.isActive('heading', { level: 6 }) }">
                h6
            </button>

            <div class="divider"></div>

            <button class="menu-item" @click="editor.chain().focus().toggleBulletList().run()" :class="{ 'is-active': editor.isActive('bulletList') }">
                <i class="fa-solid fa-list-ul"></i>
            </button>
            <button class="menu-item" @click="editor.chain().focus().toggleOrderedList().run()" :class="{ 'is-active': editor.isActive('orderedList') }">
                <i class="fa-solid fa-list-ol"></i>
            </button>

            <div class="divider"></div>

            <button class="menu-item" @click="editor.chain().focus().undo().run()">
                <i class="fa-solid fa-rotate-left"></i>
            </button>
            <button class="menu-item" @click="editor.chain().focus().redo().run()">
                <i class="fa-solid fa-rotate-right"></i>
            </button>
        </div>
        <editor-content :editor="editor" />
    </div>
</template>

<script>
import { inject, onMounted, onBeforeUnmount, reactive, toRefs, ref } from "vue";
import { useEditor, EditorContent  } from '@tiptap/vue-3'
import StarterKit from '@tiptap/starter-kit'
import Paragraph from '@tiptap/extension-paragraph'
import Text from '@tiptap/extension-text'
import TextStyle from '@tiptap/extension-text-style'

export default {
    setup(props, context) {
        const data = ref(null);
        data.value = props.data;

        const state = reactive({
            // Tiptap 에디터가 담길 변수
            editor: useEditor({
                content: '<p>I’m running Tiptap with Vue.js. 🎉</p>',
                extensions: [
                    StarterKit,
                    Paragraph,
                    Text,
                    TextStyle,
                ],
            }),
	    });

        return {
	        ...toRefs(state),
	        changeFileList,
	        removeFile,
	        previewFile,
	        handleExceed,
	        beforeRemoveFile,
        };
    },

    components: {
        EditorContent,
    },
};
</script>
(2) CSS 파일 수정
1
2
3
4
5
6
7
8
9
10
11
12
13
14
15
16
17
18
19
20
21
22
23
24
25
26
27
28
29
30
31
32
33
34
35
36
37
38
39
40
41
42
43
44
45
46
47
48
49
.editor__header {
    display: flex;
    align-items: center;
    flex: 0 0 auto;
    flex-wrap: wrap;
    padding: 0.25rem;

    .menu-item {
        width: 1.75rem;
        height: 1.75rem;
        color: #0d0d0d;
        border: none;
        background-color: transparent;
        border-radius: 0.4rem;
        padding: 0.25rem;
        margin-right: 0.25rem;

        &.is-active, &:hover {
            color: #fff;
            background-color: #0d0d0d;
        }
    }

    .divider {
        width: 2px;
        height: 1.25rem;
        background-color: #0000001a;
        margin-left: 0.5rem;
        margin-right: 0.75rem;
    }
}
.ProseMirror {
    resize: none;
    border-radius: 4px;
    padding: 5px;
    border: 1px solid #DADCDE;
    background-color: #fff;
    height: 30rem;
    overflow: scroll;

    strong {
        font-weight: bold !important;
    }

    em {
        font-style: italic !important;
    }
}
3. 에디터를 구현하려는 컴포넌트에 불러오기
<template>
	<div id="app">
		<Tiptap :detail="item.detail"/>
	</div>
</template>

<script>
import {reactive, toRefs} from "vue";
import Tiptap from './components/Tiptap.vue'

export default {
    name: 'App',

    setup(props, context) {
         const state = reactive({
			item: {
                "title": "",
                "detail": "",
            }
        });

        return {
            ...toRefs(state),
        }
    },
    components: {
        Tiptap
    }
}
</script>
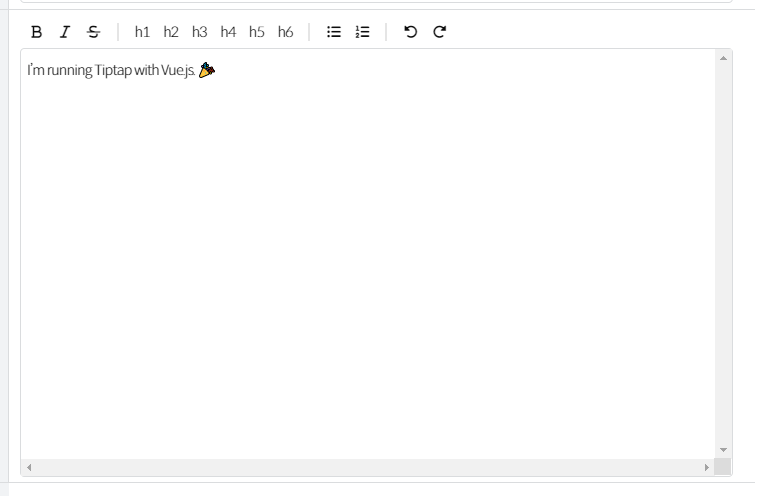
아래의 코드로 작성하면 다음과 같이 나타납니다.
이미지 업로드 만들기
1.프로젝트 폴더 내에서 터미널을 열어 아래의 명령어로 설치하기
-> Tiptap Image https://tiptap.dev/api/nodes/image
$ npm install @tiptap/extension-image
저는 element-plus로 업로드를 구현했었어서, 그대로 사용했습니다. 없으신 분들은 아래 커맨드로 받아 진행하면 될 것 같습니다.
$ npm install element-plus
2.tiptap 컴포넌트 만들기
<template>
    <div>
        <div class="editor__header">
            ...

            <button class="menu-item" @click="">
                <el-upload
                        multiple
                        action=""
                        :auto-upload="false"
                        :file-list="fileList"
                        :on-change="changeFileList"
                        :on-preview="previewFile"
                        :on-remove="removeFile"
                        :on-exceed="handleExceed"
                        :before-remove="beforeRemoveFile"
                        :show-file-list="false"
                >
                    <i class="fa-solid fa-image"></i>
                </el-upload>
            </button>
        </div>
        <editor-content :editor="editor"/>
    </div>
</template>

<script>
import {inject, onMounted, reactive, toRefs, ref} from "vue";
import { useEditor, EditorContent  } from '@tiptap/vue-3'
import StarterKit from '@tiptap/starter-kit'
import Paragraph from '@tiptap/extension-paragraph'
import Text from '@tiptap/extension-text'
import TextStyle from '@tiptap/extension-text-style'
import Image from '@tiptap/extension-image'

export default {
    props: {
        detail: {
            type: String,
        },
        option: {
            type: Object,
        }
    },
    setup(props, context) {
        const option = ref(null);
        option.value = props.option;

        const state = reactive({
            // Tiptap 에디터가 담길 변수
            editor: useEditor({
                // content: '<p>I’m running Tiptap with Vue.js. 🎉</p>',
                content: '',
                extensions: [
                    StarterKit,
                    Paragraph,
                    Text,
                    TextStyle,

                    //이미지 추가
                    Image,
                ],

                // content 변경이 일어날 때, 값을 받기 위해서 적용
                onUpdate({ }) {
                    getTiptapContent();
                },
            }),

            // 파일이 담길 List
            fileList: []
	    });


        onMounted (async () => {
            state.editor.commands.setContent(props.detail);
        });

	    const changeFileList = (uploadFile, fileList) => {
		    console.log('changeFileList');
		    const file = uploadFile.raw;
            console.log(file);

		    if (file.type !== 'image/jpeg' && file.type !== 'image/jpg' && file.type !== 'image/png') {
			    const targetIdx = fileList.findIndex(item => item.uid === file.uid);
                state.fileList = fileList.splice(targetIdx,1);
			    return toast('이미지 또는 PDF 파일을 업로드 해주세요');
		    }

		    if (file.size > option.value.fileMaxSize*1024*1000) {
			    const targetIdx = fileList.findIndex(item => item.uid === file.uid);
                state.fileList = fileList.splice(targetIdx,1);
			    return toast(`첨부파일은 ${option.value.fileMaxSize}MB를 초과할 수 없습니다`);
		    }

		    context.emit('change', fileList);

            // TODO api 호출부
            // 구현부없이 임시로 URL 받음
            const createObjectURL = URL.createObjectURL(file);

            state.editor.chain().focus().setImage({ src: createObjectURL }).run()
        };

        const handleAvatarSuccess = (res, file) => {
            console.log('changeFileList');
            console.log(file);

            state.fileList.add(URL.createObjectURL(file.raw))
        }

	    const previewFile = (file) => {
		    console.log('previewFile');
		    console.log(file);
	    };
	    const beforeRemoveFile = (file, fileList) => {
		    console.log('beforeRemoveFile');
		    return toast('파일이 삭제되었습니다');
	    };
	    const removeFile = (file, fileList) => {
		    console.log('removeFile');
		    console.log(file, fileList);
	    };
	    const handleExceed = (files, fileList) => {
		    console.log('handleExceed');
		    toast(`${option.value.limit}개 이하로 파일첨부 가능합니다`);
	    };

	    const getTiptapContent = () => {
            context.emit('change', state.editor.getHTML());
	    };

        return {
	        ...toRefs(state),
	        changeFileList,
            handleAvatarSuccess,
            removeFile,
	        previewFile,
	        handleExceed,
	        beforeRemoveFile,
            getTiptapContent,
        };
    },

    components: {
        EditorContent,
    },
};
</script>
(2) CSS 파일 수정
1
2
3
4
5
6
7
8
9
10
11
12
13
14
15
16
17
18
19
20
21
22
23
24
25
26
27
28
29
30
31
32
33
34
35
36
37
38
39
40
41
42
43
44
45
46
47
48
49
50
51
52
.editor__header {
    display: flex;
    align-items: center;
    flex: 0 0 auto;
    flex-wrap: wrap;
    padding: 0.25rem;

    .menu-item {
        width: 1.75rem;
        height: 1.75rem;
        color: #0d0d0d;
        border: none;
        background-color: transparent;
        border-radius: 0.4rem;
        padding: 0.25rem;
        margin-right: 0.25rem;

        &.is-active, &:hover {
            color: #fff;
            background-color: #0d0d0d;
        }

        .el-upload { // 이 부분이 추가 되었어요
            position: unset;
        }
    }

    .divider {
        width: 2px;
        height: 1.25rem;
        background-color: #0000001a;
        margin-left: 0.5rem;
        margin-right: 0.75rem;
    }
}
.ProseMirror {
    resize: none;
    border-radius: 4px;
    padding: 5px;
    border: 1px solid #DADCDE;
    background-color: #fff;
    height: 30rem;
    overflow: scroll;

    strong {
        font-weight: bold !important;
    }

    em {
        font-style: italic !important;
    }
}
3. 에디터를 구현하려는 컴포넌트에 불러오기
<template>
	<div id="app">
		<Tiptap :detail="item.detail" :option="option" @change="getTiptapContent"/>
	</div>
</template>

<script>
import {reactive, toRefs} from "vue";
import Tiptap from './components/Tiptap.vue'

export default {
    name: 'App',

    setup(props, context) {
         const state = reactive({
			item: {
                "title": "",
                "detail": "",
            },

            option: {
				limit: 10,		// 파일 업로드 갯수 제한
				fileMaxSize: 50,		// 파일 1개 용량 제한
				totalFileMaxSize: 100,	// 총 파일 용량 제한
			},
        });

        const getTiptapContent = (content) => {
			state.item.detail = content;
		};

        return {
            ...toRefs(state),
            getTiptapContent,
        }
    },
    components: {
        Tiptap
    }
}
</script>
위의 코드 결과물 입니다.
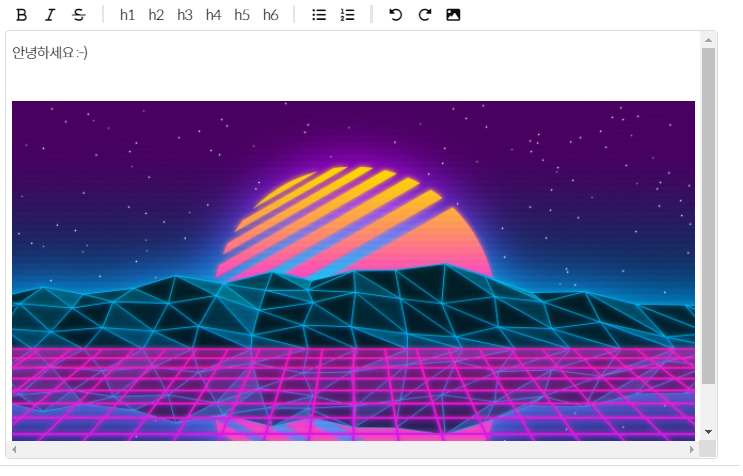
현재 커서에 있는 곳으로 이미지를 넣어주고 있습니다.
커서를 끌어서 드로그 앤 드랍으로 이미지 위치도 변경할 수 있구요. 이 점은 매우 편리하네요 :-)

커스텀해서 버튼을 넣을 수 있다는 점은 매우 좋습니다만, 자유도가 높은 만큼 일일이 직접 만들어야 하는다는 것도 초반에는 힘든 작업같아요.
그렇지만 만들고 나니까 계속 커스텀해서 사용하는 것도 무리가 없을 것 같고,,,,ㅎㅎㅎ
공식문서에서는 가이드가 중구난방으로 있어서 찾기 힘들어 따로 포스팅을 해봤습니다. 도움이 되었길 바랍니다 :-)